

If you find this post useful, please consider donating some money so I can upgrade and get rid of the ads.
Meet my old mantel, circa 1973. It was ugly. 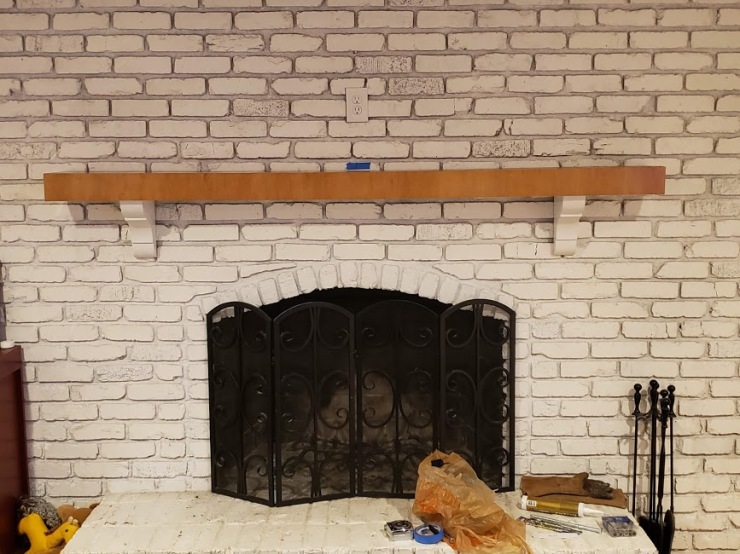 I decided to replace it with a beam from an old barn. I did some research and found these two “how to” blog posts:
— https://www.diynetwork.com/how-to/skills-and-know-how/masonry-and-tiling/how-to-install-a-floating-mantel
— https://www.runtoradiance.com/how-to-install-a-floating-mantle
I used these as guides but made some significant improvements in the process (use a template) and will clarify some things (one thing: drill into the brick, not the mortar). I’m a weekend warrior and this is doable if you’re somewhat handy and can solve problems on the fly. I ran into a few issues and you’ll probably have a curveball or two too. I also did this while nursing a table saw injury to my thumb so don’t be intimidated, just be patient. You really want to focus on two big things:
— Center the beam
— Make sure it’s level
Using the template method makes it hard not to have a level, centered mantel when you’re done.
The beam
I sourced the beam from Debbie, (585)406-1630, at The Barnwood Depot aka The Barn Side of a Broad in Garner, NC. She found me a wonderful beam, cleaned it and finished it. I love my beam.

Out with the old
Once the beam was in the house, I tore off the old mantel. Before starting, I put a piece of blue tape on the wall and marked it with the center of the existing beam (the first picture in this post shows this). Don’t let that tape fall off; if you like the way the old mantel was centered, it’s important to center the new one the same. Surprisingly, the old mantel was mounted with these four nails pounded into the mortar.
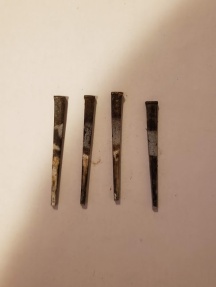
Each pair of nails held one of these to the brick. It’s only about 1.5″ wide, 4″ long and 1/2″ thick.

The corbels were attached to those blocks with some mid-range finishing nails and the mantel was attached to the corbels. Granted, it’s a hollow mantel, but it’s pretty amazing that the mantel stayed up for so long. It came off pretty easily with a small pry bar and the nails in the mortar came out with some effort.
Tools and Supplies
Here’s everything I used to mount the beam:
— Hammer Drill. I got this at Lowes for ~$50. It can also be used as a normal drill
— Reciprocating Saw. Mine broke cutting the last lag bolt. You might have better luck with an angle grinder.
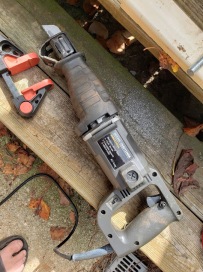
— The best carbide metal-cutting reciprocating saw blade you can afford
— Clamps (I’ll explain later; I had to improvise)
— ½” drill bit (for wood); at least 8” long
— ¾” drill bit (for brick)
— Five ½” lag bolts; 10 inches long (buy a 6th in case your screw one up like I did)
— Lag shields. Lowes doesn’t sell these so go to Home Depot

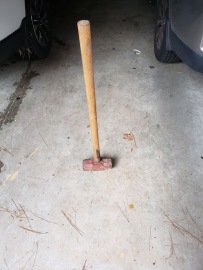
— 25-pound sledgehammer and some sacrificial 2x8s so you’re not hammering the beam directly
— Level
— Vice grips
— Compressed air (I used canned air)
— Shims (or as I call them, “paint stirrers”; another improvisation)

— LIQUID NAILS FuzeIt
— Gorilla Glue Construction Adhesive (another hack. I couldn’t find lag shield epoxy)
— Caulking gun
— 1”x4”x8’ board to create a template (trust me here. It cost $2 and saved me a ton of hassle)
— Sharpie, blue painters’ tape, beer for the brother on-law/helper, Advil, one small Band-Aid

Prep work
I did this part myself but you will save a lot of grief if you have help. When I took off the old mantel, I got a good look at the original color of the brick and it was really easy to see where the top of the old mantel was (you should mark the top on the wall just in case). I wanted to completely cover the old brick to avoid painting but not raise the top of the mantel too much.
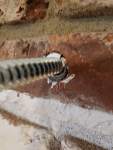
I used the first full row of brick below the top of the old mantel to hold the lag bolts. You may notice that one of “how-to” links I posted showed them drilling into the brick and the other showed them drilling into the mortar. I did a lot of research and asked a few masons. I didn’t get a clear answer but decided to drill into the mortar since it would be “easier”. I started by drilling a 3” hole in the mortar joint (one of the “T” joints so I had room), inserting a lag shield, and using a socket wrench to screw the lag in. I then took the reciprocating saw with the carbide blade and cut the head off the lag bolt. The bolt shook so much it bent the lag bolt and it loosened the shield. Since you don’t really need a lot of force to get the lag bolt screwed in, I decided to cut off the heads using this rig (this is why I needed clamps; a vice would work but I don’t have one) and then used vice grips to screw them in.
I have no idea if an angle grinder would work better or not. With the vibration causing the hole in the mortar to get so loose, I decided to drill into the brick and highly recommend that you drill into the brick. I think the odds of the mantel sagging over time will be higher if you use the mortar joints. Besides, once this thing is on the wall, you’re not getting it down so you’ll never have to worry about repairing the brick.
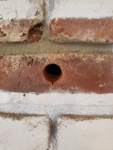
I drilled a 3.25” – 3.5” hole in the center of the brick nearest the center mark and then every other brick in each direction.
I drilled 5 holes total; tighten the chuck after every hole (my bit came lose a few times). I highly recommend having someone suck up the dust as you’re drilling (hold the vacuum hose right at the hole). After drilling each hole, use the canned air to blow out the dust (again, have someone hold a vacuum at the hole while you do this). My holes weren’t evenly spaced (they were close) and they’re not level (and don’t need to be); don’t sweat it. I squeezed in a healthy amount of the Gorilla Glue into each hole, inserted a lag shield in each, and screwed in each lag bolt (I clamped the vice grips on the threads so it would hold). Don’t screw them in too far or you can force the lag shield out (I did this once).


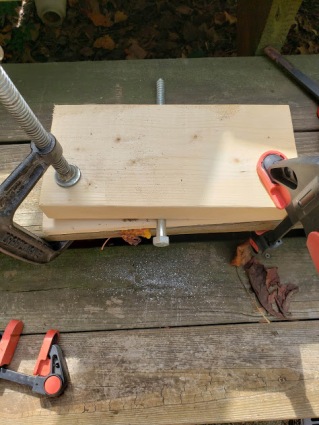
The template
Don’t skip this step. Trust me. My beam is dead-on level and centered because of this method. Trying to measure each hole correctly on the beam would have been nearly impossible.
Take the 1”x4”x8’ board and drill a ½” hole in the middle. Slip the middle lag bolt into this hole, level the board and then hit the board with a hammer on the next lag bolt to the right. Pull the board off and drill a ½” hole at the mark left on the board. Now slip the middle lag into the center hole and the lag to the right in the second hole. Double check the level and bang the board with a hammer on the lag bolt to the left of center. Take the board down, drill a ½” hole at the mark left on the board. Repeat this process for the remaining two lag bolts. Now slide the board on all the lags bolts and push it up against the wall. It’s harder than you think it should be; this is foreshadowing of what’s to come when you mount the beam.

Once the template is up against the wall, mark the center of the old mantel onto the template. Also mark which way is up and which side faces the wall (or beam … or both). This is how level my template was.

Mounting the beam
I took an overnight break for a few reasons:
- I wanted the Gorilla Glue to cure to make sure those bolts weren’t going to move at all
- If you do everything up to this point, alone and in one day, you’re going to be pretty tired and sore (Advil), and likely pissed off if your reciprocating saw falls apart (hence the band-aid) like mine did.
- It was my birthday and I wanted to relax
- It was also my brother-in-law’s birthday and he couldn’t come over to help until the next day
The first thing you want to do is mount the template on the beam. Make sure the beam is level and mark the middle of the beam (I used a piece of painter’s tape and marked that). I measured about an inch down from the top, placed the beam-side of the template against the beam, lined up the center marks and screwed a screw into the template to hold it to the beam. I then leveled the template and screwed in a total of four screws across the length of the template (checking level each time).
Measure the longest lag bolt and mark your drill with tape at that length plus 1/4” or so; my hammer drill came with a depth guide, so I used that. Flip the beam face-down (template up) and drill each hole about 2” deep. Remove the template and lift the beam up onto the lag bolts. They should line up perfectly. You can skip this step, but I feel it’s easier to recover from a 2” hole versus a 7” hole. Assuming they lined up (they will; that’s the beauty of the template), lay the beam back down and drill the holes to depth. I had my brother-in-law hold a level plumb against my drill to make sure my holes were perfect. I had to clear the bit 3-4 times for each hole. I used the canned air held upside down to clear out the hole and cool the bit (hold the can upside-down and the air comes out cold enough to burn your skin; it works great to cool the hole and drill bit). Do yourself a favor and don’t force it; I had smoke coming out of one holes when I didn’t stop when the bit stopped digging in. You also don’t want to risk breaking the drill bit off in the hole. Be very careful that you don’t drill through the front of the beam.
Blow out each hole completely then squeeze in a lot of Liquid Nails in each hole and load the beam itself with it too (a nice fats squiggly line down the full length).
Hammer Time
Lift the beam up and get it on the lag bolts. Use your hand to confirm everything lined up and get Liquid Nails all over your hand. Swear a few times and wipe your hand off on your shorts because you can’t put the beam down and you don’t want to get Liquid Nails all over the beam. If you’re lucky, you’ll get the beam on about an inch before it stops. You might be able to push really hard on it and get another inch. After that, you’ll be using the sledgehammer. Hold a 2×8 (2×6, 2×4, whatever you have) flat against the face of the beam directly over a lag bolt. Smack it hard with the sledge. Move to the opposite end and do the same. Go to the other end and smack over the next lag bolt in, then do the other side and in the middle. Keep moving back and forth until the beam is supported by the lag bolts. At that point, your helper can hold the 2×8 and you can use two hands on the sledgehammer and really whack it. It took about a half hour to get the beam on flush to the wall; this explains why you need Advil after mounting the beam (swinging a 25 pound hammer with one hand hurts. Using two hands isn’t a lot better.)
Level it
Throw a level on the beam. It should be perfectly level horizontally. Unfortunately, mine was tilted forward. About 5 seconds of panic set in until I figured out a solution. Thankfully, I have a floor jack. I used the jack and a 2×4 to lift up the front of the mantel until it was level from front to back.

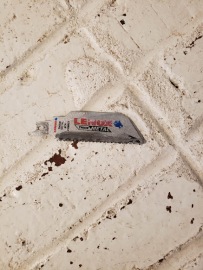
I then slid (with the help of a hammer) a thick paint stirrer between the beam and the wall from underneath. I scored the stirrer with a utility knife flush with the beam and snapped it off. I used the stirrer and a hammer to tap the piece up a little more so it can’t be seen. I put in a shim like this at every lag bolt. When I lowered the jack, the beam stayed level from front to back.
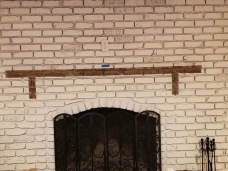
It’s done!
Here’s the finished product. I think it came out awesome! I might add a bead of clear silicone along the edge against the wall but that can wait.


One Reply to “”